
Alan's Rear Bumper
Page 2
I asked Alan how he bent the top plate to rise up under the tailgate.
"Chuck, the bend in the top plate was easy, did it on a brake at the steel warehouse. I had them make up a section 8' long and I cut it to fit once I got the bumper built. The hard part was UNbending the center section. That took the blue brake, a piece of 1/2" plate for a backer and several C clamps. Surprisingly, the 1/8" was hard to keep hot all the way across the work area (about 15"). We got it partly straightened and then worked it with the backer and clamps. It's s little wavy, but most of it will be behind the license plate so it won't show anyhow.
I haven't seen the invoice for the material yet but I'm thinking
somewhere around $100. (edited 4/30, the invoice arrived today, $121.07, some of
that doesn't really count as it will be in stock for future projects)
You're welcome to use anything I post on your site. If it's easier I can send
you the pictures directly.
I had to get going on this project, partly because I need to be able to tow with
this truck and also because I want to have it ready to go to the galvanizers
when the fab shop has their load ready. If it's not a big load I may haul it for
them, I think it's going to Hartford, CT. The last stuff I had galvanized I
hauled a load for this same shop in exchange for them having my stuff done. At
that time I had two plow mounts, a bumper and headache rack done."
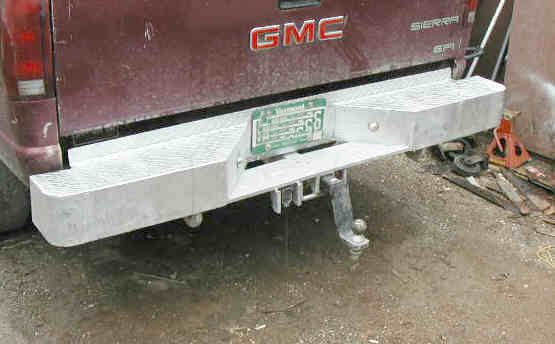
It's on!
Here it is, completed and installed temporarily. It will come off to go to the
galvanizers but in the meantime I can use it. Whatever rust it acquires before
then will come off in the tanks. The license plate is deliberately mounted
off-center to allow more room for access to the spare time "winch", that hole
has yet to be located and drilled. The hitch receiver is complete and the
trailer connector is mounted and wired. The trailer connector has brackets to
accept a steel plate cover to protect it when plowing, frozen snow banks raise
hell with the plastic plugs (been there, done that). The things sticking down on
each side of the hitch are heavy pad eyes, put there to provide an anchor point
for the inevitable unsticking. They are located right under the frame brackets
on each side so they are accessible when the vee box is installed and blocking
the hitch.
Hitch Details
Here's a close-up of the hitch and tow rings. The hitch tube is 3/16" wall with
a band of 1/4" stock added at the open end to reinforce it. The square loops on
each side of the hitch sleeve are for safety chains. Not visible are the 1/4"
plates added on each side of the hitch tube where the cross pin goes through.
Not so much for strength as to put more material around the pin hole so it isn't
so prone to jugging out from the constant pounding of the pin. The pad eye shows
in more of a side view as well. The eye itself was cut from 3/4" plate, the hole
is big enough to accept a shackle pin or the "J" hook on a tow truck cable.
Should be stout enough that, regardless of how bad the truck is stuck there is
no danger of it coming loose under strain.

Bolts, bolts & more bolts....
A little fuzzy, but to the left of the spring hanger is one of the mounting
plates, with 2 Gr. 8, 1/2" bolts through the frame. behind and above the hanger
you can see the 3 bolts through the mounting plate there. I didn't bother
figuring the single shear value on 10 of those bolts but I think the frame will
fold first. There's a spare (oops) hole in the front plates, I had drilled them
without checking and when I got them on the truck it was apparent that I would
not be able to drill the frame through the lower hole because the spring was in
the way.

Here it is all galvanized.
Here is a cab protector Alan made as well. It too got galvanized.

Back To: Snowplowing-Contractors.com - Home Page
Back To: Chuck's Chevy Truck Pages.com - Home Page
7-11-03